Been working on a few commission pieces as of late, one of which is the Primarch of the III Legion, Fulgrim. While I love painting challenging models, these new special characters for the Horus Heresy setting from Forge World are challenging indeed. The bases alone are a massive pain in the ass, and each model has so much detail that the surgical skills I acquired as an aspiring med student in another lifetime really helped out a lot.
A blog about my misadventures in learning to paint miniatures for my tabletop gaming hobby since 2010. I may never reach professional quality, but it'll be fun trying to do so.
Showing posts with label GW. Show all posts
Monday, January 27, 2014
Saturday, June 09, 2012
Blood Angels Stormtalon
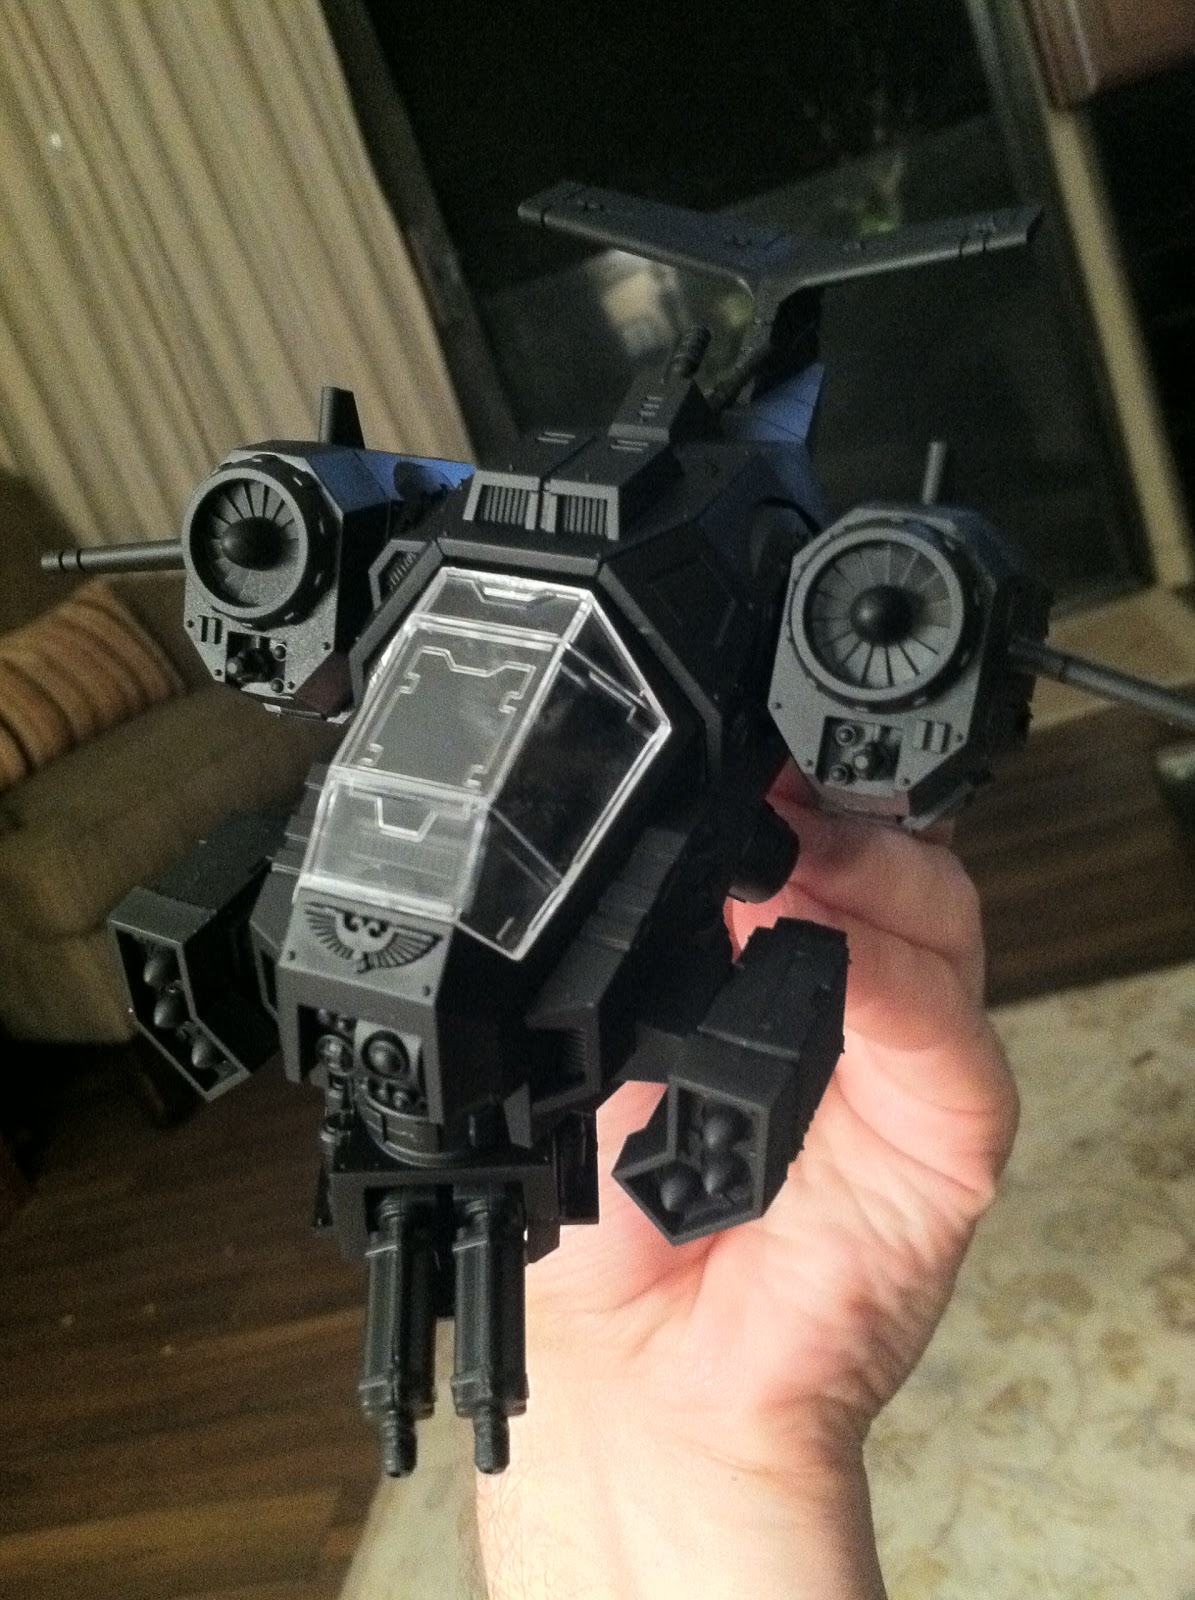
As many know, I love Space Marine vehicles. Their unrealistic boxy aesthetics is something I find appealing. Maybe it's because I drive a Honda Element which looks like something a Space Marine woudl drive. In any case, last weekend the Stormtalon was released from GW for Codex: Space Marines. It fills a Fast Attack slot on the FOC and has some fairly interesting rules. It's essentially a squished down, one-man Stormraven. While it doesn't have Power of the Machine Spirit nor does it have the nose-mounted multi-melta/heavy bolter/typhoon missile weapon pod, it does mount a twin-linked assault cannon as standard with your choice of twin-linked heavy bolter, twin-linked lascannon, typhoon missile launcher, or the new Skyhammer missile launcher which is a 60" S7 AP4 Heavy 3 option.
So needless to say, I had to get one and paint it in the colors of Great Sanguinius - RED ALL THE THINGS! Even though Blood Angels don't get to use this beautiful flying potato, our group is pretty casual and tend to let things slide within reason. As soon as I got it home, I went to work. There are only two sprues and the vehicle is very easy to assemble. I was able to put it together in about 30 mins. I also magentized the side weapon pods so I can swap out for the Lascannon or Skyhammer options.
Once the model was built, I primed it black using GW Chaos Black.
Here's a size comparison between the Stormtalon (left) and its bigger sibling, the Stormraven (right)
Now that dextrous control over my airbrush is increasing, I felt comfortable to try and use a pre-shading technique on this vehicle. After the black primer has dried, using my Iwata CS airbrush, I carefully sprayed watered down Administratum Grey on to the raised or exposed areas, leaving the black primed areas in the recesses. This gives the model an appearance of shadowed recesses and also allows for some depth.
Once the highlights have dried, I take thinned down Blood Red (50/50 Blood Red and Isopropyl Alcohol) and spray a thin layer over the entire model. The goal is to apply the layer thin enough where the grey highlights only just absorb enough red but not enough to blot out the shaded details. This gives the model a very cool layered appearance while the black maintains the look of having been shaded. Unfortunately the poor resolution of my iPhone camera doesn't allow for all the shading to appear clearly so I tried using the HDR feature and only marginally was able to capture some of the shading.
I painted the Techmarine Pilot using Khorne Red base, Carroburg Crimson shade, then highlighted with Wazdakka Red and finally Squig Orange to give it a darker, rusted red of Mars look. The cockpit was painted and the canopy was glued down. The rest of the details were then painted in.
Finally, I decided to test my potato out against some Orks in a 2500pt match. Unfortunately my opponent didn't want it getting near him so he kept it on lockdown all night until finally the potato was baked.
Sunday, April 08, 2012
Step by step of a Blood Angels Terminator with the new GW paints
This was a rather rushed paint job in order to just illustrate how the new GW paints work when painting red for Blood Angels. The new paints create a much more gradient approach to painting minis. Whereas previously you had to do some mixing of paints to create certain gradient colors, but the new paints offer pre-made increments that make the process relatively straight forward.
My previous process was to use Mechrite Red as the Foundation paint, Blood Red as a base, shaded with Devlan Mud wash, then re-highlighted with Blood Red. The next highlight was done with Blazing Orange then an extreme highlight with Vomit Brown concluded with a watered down Baal Red wash to re-center the blends.
With the new paints the process went as follows:
1. Assembled the Terminator
2. Primed with Chaos Black primer
3. Base coated with Mephiston Red Base. This base paint is a little different in hue that Mechrite Red. It's closer to the former Blood Red than it is Mechrite Red.
4. A coat of Wild Rider Red was used to 'redden' the hue a little more. This gave it a slightly orange tone.
5. Carroburg Crimson was then used to shade the model. This color is between Baal Red and Devlan Mud. IT is a much more appropriate shade for red models like Blood Angels.
6. Wild Rider Red was then used to re-layer the raised surfaces.
7. Wazdakka Red was then layered in smaller areas.
8. Troll Slayer Orange was then used to highlight the raised surfaces.
9. The Drybrush paint Eldar Flesh was used to drybrush the edges. Normally this would've been layered by Vomit Brown but the drybrush paint seemed a bit more apropos. I would've loved to have used Kindleflame which is recommended by GW but I forgot to pick up a pot and they're closed on Easter.
10. Finally, Bloodletter Glaze was used to tone down the highlights and re-center the colors.
My previous process was to use Mechrite Red as the Foundation paint, Blood Red as a base, shaded with Devlan Mud wash, then re-highlighted with Blood Red. The next highlight was done with Blazing Orange then an extreme highlight with Vomit Brown concluded with a watered down Baal Red wash to re-center the blends.
With the new paints the process went as follows:
1. Assembled the Terminator
2. Primed with Chaos Black primer
3. Base coated with Mephiston Red Base. This base paint is a little different in hue that Mechrite Red. It's closer to the former Blood Red than it is Mechrite Red.
4. A coat of Wild Rider Red was used to 'redden' the hue a little more. This gave it a slightly orange tone.
5. Carroburg Crimson was then used to shade the model. This color is between Baal Red and Devlan Mud. IT is a much more appropriate shade for red models like Blood Angels.
6. Wild Rider Red was then used to re-layer the raised surfaces.
7. Wazdakka Red was then layered in smaller areas.
8. Troll Slayer Orange was then used to highlight the raised surfaces.
9. The Drybrush paint Eldar Flesh was used to drybrush the edges. Normally this would've been layered by Vomit Brown but the drybrush paint seemed a bit more apropos. I would've loved to have used Kindleflame which is recommended by GW but I forgot to pick up a pot and they're closed on Easter.
10. Finally, Bloodletter Glaze was used to tone down the highlights and re-center the colors.
Thursday, March 08, 2012
Finished Blood Angels Assault Terminator
Finally finished my Assault Terminator. This was perhaps the most technically complicated/advanced painting technique I've ever employed and I'm incredibly happy with the results. The red alone was an eleven-step process. The Crux Terminatus on his left shoulder was an 9 step process. Even the gold trimming on the shield, hammer, belt, and wrists were a four-step process. While the quality comes nowhere near the 'Eavy Metal level, it was interesting to follow in one of their painter's footsteps and use their techniques.
The only thing I’m disappointed in is the gloss factor in the photos. I used a brush on matte coating and it came out a little glossy and not sure why when in-person it’s actually pretty matte.
There's no way in hell I'd use this for every single mini, otherwise it would take me months just to paint a single squad. As it is, I've spent close to 60 hours on this guy.
For the red armor:
1. Primed black
2. Base coated 1:1 Dark Flesh/Blood Red
3. 2:1:1 Chaos black/Dark Flesh/Blood Red watered down and added to the recesses
4. 3:1 Blood Red/Dark Flesh layered on to the armor, avoided the shaded areas
5. Pure Blood Red was then layered into the much more prominent areas of the armor
6. Pure Blazing Orange used as a highlight to the armor panels
7. 2:1 Blazing Orange/Vomit Brown was used for edging/extreme highlighting
8. Watered down Baal Red wash was used to re-center the layers and tone down the gradients
9. 2:1 Blazing Orange/Vomit Brown was then re-applied to the highlighting in a thinner edge.
10. This resulted in a very dark red model so I then mixed 4:1 'Eavy Metal Matte Medium/Blood Red and applied it as a glaze to brighten it up.
11. Blending again 2:1 Blazing Orange/Vomit brown
For the Crux Terminatus:
1. Primed black
2. 1:1 Chaos Black/Scorched Brown leaving the recesses black.
3. Wash of 1:1:1 Scorched Brown/Chaos Black/Badab Black liberally applied.
4. Codex Grey layered on over the raised areas.
5. Fortress Grey then used as a midtone.
6. Highlights with Deneb Stone.
7. Highlights with 2:1 Deneb Stone/Skull White.
8. Highlights with 1:1 Deneb Stone/Skull White.
9. Edging with pure Skull white.
For the gold parts:
1. 1:1 Scorched Brown/Shining Gold.
2. Washed with 1:1 Scorched Brown/Chaos Black.
3. Layered on Shining Gold to the raised surfaces.
4. Layered Burnished Gold on to the highlights.
5. Mithril Silver was used sparingly just on the most prominent parts.
The only thing I’m disappointed in is the gloss factor in the photos. I used a brush on matte coating and it came out a little glossy and not sure why when in-person it’s actually pretty matte.
There's no way in hell I'd use this for every single mini, otherwise it would take me months just to paint a single squad. As it is, I've spent close to 60 hours on this guy.
For the red armor:
1. Primed black
2. Base coated 1:1 Dark Flesh/Blood Red
3. 2:1:1 Chaos black/Dark Flesh/Blood Red watered down and added to the recesses
4. 3:1 Blood Red/Dark Flesh layered on to the armor, avoided the shaded areas
5. Pure Blood Red was then layered into the much more prominent areas of the armor
6. Pure Blazing Orange used as a highlight to the armor panels
7. 2:1 Blazing Orange/Vomit Brown was used for edging/extreme highlighting
8. Watered down Baal Red wash was used to re-center the layers and tone down the gradients
9. 2:1 Blazing Orange/Vomit Brown was then re-applied to the highlighting in a thinner edge.
10. This resulted in a very dark red model so I then mixed 4:1 'Eavy Metal Matte Medium/Blood Red and applied it as a glaze to brighten it up.
11. Blending again 2:1 Blazing Orange/Vomit brown
For the Crux Terminatus:
1. Primed black
2. 1:1 Chaos Black/Scorched Brown leaving the recesses black.
3. Wash of 1:1:1 Scorched Brown/Chaos Black/Badab Black liberally applied.
4. Codex Grey layered on over the raised areas.
5. Fortress Grey then used as a midtone.
6. Highlights with Deneb Stone.
7. Highlights with 2:1 Deneb Stone/Skull White.
8. Highlights with 1:1 Deneb Stone/Skull White.
9. Edging with pure Skull white.
For the gold parts:
1. 1:1 Scorched Brown/Shining Gold.
2. Washed with 1:1 Scorched Brown/Chaos Black.
3. Layered on Shining Gold to the raised surfaces.
4. Layered Burnished Gold on to the highlights.
5. Mithril Silver was used sparingly just on the most prominent parts.
Monday, March 05, 2012
'Eavy Metal style of Blood Angels
My normal method of painting red on my Blood Angels has been pretty formulaic. If I need quick results, I'll use Army Painter's Pure Red, then shade with Devlan Mud then highlight with Blazing Orange then Vomit Brown. If I wanted quality results, I'll prime black, then gradually layer Blood Red. I'll then drench it in Devlan Mud then gradually build up Blood Red layers followed by Blazing Orange, Vomit Brown, then re-adjust the hue with watered down Baal Red.
I wanted to try some 'Eavy Metal style of painting so I used Anja Wettergren's method of painting Blood Angels Terminators from the October 2009 issue of White Dwarf feature the 3rd edition of Space Hulk. I improvised a little more and added a couple extra steps (steps 10 and 11 were not in the original tutorial).
1. Primed black
2. Base coated 1:1 Dark Flesh/Blood Red
3. 2:1:1 Chaos black/Dark Flesh/Blood Red watered down and added to the recesses
4. 3:1 Blood Red/Dark Flesh layered on to the armor, avoided the shaded areas
5. Pure Blood Red was then layered into the much more prominent areas of the armor
6. Pure Blazing Orange used as a highlight to the armor panels
7. 2:1 Blazing Orange/Vomit Brown was used for edging/extreme highlighting
8. Watered down Baal Red wash was used to re-center the layers and tone down the gradients
9. 2:1 Blazing Orange/Vomit Brown was then re-applied to the highlighting in a thinner edge.
10. This resulted in a very dark red model so I then mixed 4:1 GW Matte Medium/Blood Red and applied it as a glaze to brighten it up.
11. From there I reapplied Blazing Orange from Step 6 and then the edging highlight from Step 7.
The result is an absolutely gorgeous model. I don't dare say I can even come close to Anja's quality of painting, but following in her footsteps at least gives me an idea the lengths these artists go to in order to paint obscenely beautiful minis.
I wanted to try some 'Eavy Metal style of painting so I used Anja Wettergren's method of painting Blood Angels Terminators from the October 2009 issue of White Dwarf feature the 3rd edition of Space Hulk. I improvised a little more and added a couple extra steps (steps 10 and 11 were not in the original tutorial).
1. Primed black
2. Base coated 1:1 Dark Flesh/Blood Red
3. 2:1:1 Chaos black/Dark Flesh/Blood Red watered down and added to the recesses
4. 3:1 Blood Red/Dark Flesh layered on to the armor, avoided the shaded areas
5. Pure Blood Red was then layered into the much more prominent areas of the armor
6. Pure Blazing Orange used as a highlight to the armor panels
7. 2:1 Blazing Orange/Vomit Brown was used for edging/extreme highlighting
8. Watered down Baal Red wash was used to re-center the layers and tone down the gradients
9. 2:1 Blazing Orange/Vomit Brown was then re-applied to the highlighting in a thinner edge.
10. This resulted in a very dark red model so I then mixed 4:1 GW Matte Medium/Blood Red and applied it as a glaze to brighten it up.
11. From there I reapplied Blazing Orange from Step 6 and then the edging highlight from Step 7.
The result is an absolutely gorgeous model. I don't dare say I can even come close to Anja's quality of painting, but following in her footsteps at least gives me an idea the lengths these artists go to in order to paint obscenely beautiful minis.
| Apologies for the poor quality image as I took the photo at my desk at work. Will provide a better one later. |
Monday, February 27, 2012
Pre-Heresy Runepriest Ohthere Wyrdmake.
A pre-Heresy Space Wolf Rune Priest. Fluff-wise I guess he would be Othere Wyrdmake, the Runepriest responsible for bringing evidence during the Council of Nikaea against the Thousand Sons for their use of sorcery, leading to a ban on all Librarians.
During the burning of Prospero, he had a raven with him that Ankhu Anen thought was a good omen but unfortunately led to the destruction of the cult library, eradicating thousands of years of history and research. He was ultimately killed by Ahriman after realizing that the Space Wolves had been manipulated by Chaos to attack the Thousand Sons.
Tuesday, February 21, 2012
Just some WIP's
Just a couple of recent projects. I've had the privilege of getting my hands on an old Rogue Trader-era Land Raider from a colleague at work. This Warhammer 40K equivalent of a '64 1/2 Mustang is in pristine condition. I modified the tank hatch to fit a modern Space Marine tank commander that can also accomodate a pintle-mounted storm bolter. Aside from that, everything else is original. It's being painted in Blood Angels colors using my now-standard method of pre-shading before putting on red.
I also started working on my long-overdue Lucius pattern drop pod from Forge World that's been sitting on my to-do list for months now.
Monday, February 13, 2012
Saturday, February 11, 2012
Forge World Mk II "Crusade" Assault Marine
Finally got my Forge World order in of Mk II 'Crusade' pattern assault marines. I love the archaic, Rogue Trader-style jump pack and the Pre-Heresy armor.
Thursday, February 09, 2012
Progress on Othere Wyrdmake
This Heresy-era Runepriest is to be my rendition of Othere Wyrdmake. Yes I know he died during the Heresy so he shouldn't have a Crux Terminatus on his shoulder. But he did have a raven with him and this Njal model has a raven so I'm taking some creative liberties.
Wednesday, February 08, 2012
Heresy-era Space Wolves Runepriest
I love the Horus Heresy novels, and the archaic style of technology that was present during the Great Crusades. I wish the HH novels would've spent more time on the Great Crusade instead of launching right into the Heresy. One thing that's well known about my 40K hobbying is that I hate Space Wolves. But after reading Prospero Burns, I think I gained a modicum of respect for them. So I decided I would try and paint a heresy era Runepriest. I can't say he's pre-heresy since he has the Crux Terminatus on his shoulder, but the color scheme is that of the Crusade era.
This is my attempt at painting one of the Vylka Fenryka after the burning of Prospero, equipped in Terminator Armor. Still not quite done yet obviously.
Liche Priest
Last night Larry and I engaged in an epic battle of craftsmanship. Larry assembled something like 40 or 80 Skaven Rats to my 18 Tomb King Warriors. Apparently Larry’s assembly line format was far superior to my hand clipping everything off the sprue. Furthermore Larry cheated by only assembling the heads, body, and attaching it to the base; the arms slot into the body instead of needing to glue it on. But on the flip side I managed to get three models partially painted.
Dr. Amun Muntuhotep with body guards Mungo and Jungo
Monday, February 06, 2012
Necrosphinx has color
I was originally going to simply plagiarize the color scheme of the model I saw, but the metallic parts seem just a bit too drab. I wanted to still go with a minimalist approach to color so I just added a bit of Mechrite Red, and highlighted each triangle with Blood Red. HUGE pain in the ass.
My attempt at freehand
I cannot draw. I've tried for years. I even took an art class in high school to see if a structured foundation would nurture any latent (and clearly absent) talent. While I did gain some basic skill in drawing freehand, the ability to draw anything impressive was beyond my grasp. Clearly girlfriends don't like being drawn as stick figures.
So when I was painting my friend's Raven Guard Chaplain, I thought I'd be able to just use a transfer decal sheet for it. But no, apparently it's the only chapter that GW doesn't make decals for unless you buy the bajillion dollar Forge World decal sheet. I tried printing my own decals using decal printing paper but the decal paper came out horrible and wouldn't adhere to the model.
So I thought I'd paint my own, freehand.
This is the logo I was trying to re-create:
I guess it came out halfway decent.
So when I was painting my friend's Raven Guard Chaplain, I thought I'd be able to just use a transfer decal sheet for it. But no, apparently it's the only chapter that GW doesn't make decals for unless you buy the bajillion dollar Forge World decal sheet. I tried printing my own decals using decal printing paper but the decal paper came out horrible and wouldn't adhere to the model.
So I thought I'd paint my own, freehand.
This is the logo I was trying to re-create:
I guess it came out halfway decent.
Thursday, February 02, 2012
Raven Guard Chaplain
Finally have time to catch up on models I promised to paint for other people, this is going to be a Pre-Heresy Raven Guard chaplain. Using a Max-mini PH jump pack found here.
Tuesday, January 31, 2012
Changing gears
Now that the painting league is finished, I've decided to switch gears and try my hand at Warhammer Fantasy. I've chosen Tomb Kings as my army and what other model has such a presence as the Necrosphinx?
Monday, January 30, 2012
Painting league winner
Recently the Mission Viejo Games Workshop hosted a painting league that started late last year. The goal was to have 1500 points of your chosen army built, painted, and presented along with a few extra credit items along the way. I barely won by just a few points but I can now proudly say I have a fully painted army to play with. The below pictures were my entries into the league.
The Blood Angels 2nd Company:
HQ: Librarian with Jump Pack
Elite: 2x Sanguinary Priests
Elite: Blood Angels pattern Contemptor Dreadnought
Elite: Furioso Librarian Dreadnought
Troops: 10x Assault Marines in a Rhino
Troops: 10x Assault Marines with Jump Packs
Fast Attack: Baal Predator
Heavy Support: Stormraven
Miscellaneous: 1x Custom building and 1x Crashed Aquila Lander for terrain pieces.

The Blood Angels 2nd Company:
HQ: Librarian with Jump Pack
Elite: 2x Sanguinary Priests
Elite: Blood Angels pattern Contemptor Dreadnought
Elite: Furioso Librarian Dreadnought
Troops: 10x Assault Marines in a Rhino
Troops: 10x Assault Marines with Jump Packs
Fast Attack: Baal Predator
Heavy Support: Stormraven
Miscellaneous: 1x Custom building and 1x Crashed Aquila Lander for terrain pieces.

Subscribe to:
Posts (Atom)